Potplayer is arguably one of the most feature packed video players out there. And thanks to these features, it’s more than just your run the mill video player.
One feature I’ve been playing around with of late is the video recording feature which I was well aware of its existence though I had never found a good reason to use it until recently.
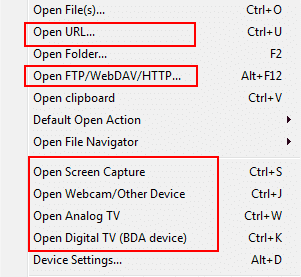
It’s from that experiment that I discovered the player could also record content from external sources such as Analog TV, Digital TV, Webcam and Streaming content (URL, FTP etc.). Well, that’s assuming you’ve set them up correctly (including the hardware) to work with the player first.
To put it simply, anything that’s playing on the player can be recorded. Even if you want to record a playing DVD/Bluray, you’re welcome to do that. Which now reminds me, this feature can be used to “rip” DVDs and the like.
But make no mistake this is NOT screen recording. That is, it’s not recording whatever is showing on your monitor. Instead, it records direct from the “source” i.e. whatever it’s decoding for you to watch.
So you can actually minimize or leave it in the background to do the recording as you use your computer to do something else.
So if this sounds like something you’d want to do, here’s how you go about it.
Step 1: Configure Video Source to Record
1. Get the latest Potplayer from the official page here and install. It’s only available for Windows (32 & 64 bit).
2. Next set up the player to play the content you want to record.
- If it’s something on your computer or portable media (CD/DVD/Bluray/Disk etc.) open it with the player the usual way or drag and drop inside its window.
- For TV content (Analog TV or Digital TV) you’ll have to configure them to work with player first by going to Preferences > Device or by pressing Alt+D. Once you’ve set up them correctly go to: menu/right-click > Open Digital TV (BDA Device) or Open Analog TV.
- For network/streamed content, go to: menu/right-click > Open URL… or Open FTP/WebDAV/HTTP.
TIPS:
- If you want to record yourself with your webcam and have PotPlayer record the video plus audio as well as do the encoding on the fly read here.
- PotPlayer can also do the traditional screen capture/recording with support for a PIP mode.
Step 2: Configure the Video Recording Settings
1. Once you’ve your media playing on Potplayer it’s now time to set up the video encoding settings.
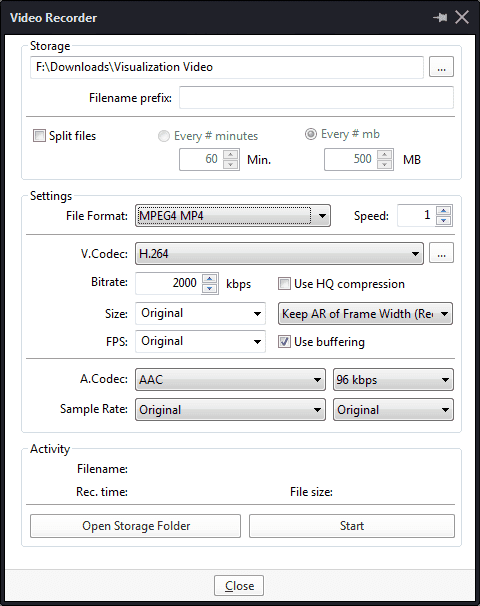
To do that, open the Video Recorder by going to: go to: right-click > Video > Video Recording > Record Video or just press Alt+C.
2. In the Video Recorder settings, first select where to save the recorded video and give it a filename prefix if need be.
3. Next, from the drop down menu select the video format you’ll want the player to use for the recording.
For maximum flexibility, MKV is the best choice as it gives you the widest choice of video and audio codecs to use (lossy and lossless ones).
MP4 is however the most widely used format and so that’s most likely what you’ll want to use. The caveat though is that will lessen the choice of codecs you can use.
NOTE:
- Codecs (audio and video) are different from video and
audio containers which is what we refer to as formats (MKV, MP4, WebM,
MP3, AAC, WMA etc.). They come in two varieties – lossy and lossless. Lossy codecs are what we typically use in most scenarios. - Codecs are
ones that determine the compatibility with various devices and most
importantly, the quality versus size of your video. Good codecs will
produce high quality video/audio at smaller sizes however they often
need more processing power to do this. - Codecs will also determine which
format (container) and as such will only accept a particular combination
of codecs. For instance, the WebM format will only accept VP8/VP9 video
and Vorbis audio while MKV will work with almost any combination of
video and audio codecs thrown at it. - End of lesson folks. If you want to learn more of this boring stuff, I’ve explained much of it here.
So regarding the codecs to use, for good quality at reasonable sizes I recommnd using H.264 for video and AAC for audio. MP4, AVI, WMV and MKV will accept this combination. For any other combination, MKV and AVI will provide with the widest choice of codecs to use.
On the other hand, if you choose to use lossless codecs (RAW, YUV, Direct Stream, VFW, PCM, FLAC etc), MKV is your best choice. However, note the output size will be very large (hundreds of MBs for just a couple of seconds) so make sure beforehand that you’ve the space to accommodate this.
The other parameters (size, fps and bitrate) will depend on whatever you’re recording:
- For the size (resolution) I think it’s wise to leave it at Original so that it uses what the source content is using. Either that or something lower.
- FPS should be just left at Original.
- The default bitrate of 2000kbps should suffice for most use but you can go higher if you want higher quality. Go down if you want smaller file sizes at the expense of quality.
- Similarly, for the audio codecs, I’d leave the parameters at Original (i.e. Sample rate, Channels) and only adjust the bitrate if the default setting is not sufficient.
Step 3: Start the Recording
1 With the video recording parameters set, its time now to hit the Start button.
You can check the progress as it records or you can switch to the playing window and leave the recording to happen in the background as you watch.
You can also minimize the player to the background and use your computer to do something else as it records.
For this to work however, make sure the Minimize Pause/Resume Play option in Preferences > General is turned off. Otherwise the video will pause and and so will the recording.
NOTE:
- If you pause the video, the pausing won’t be recorded.
Instead the recording is paused as well and only resumes when the video
is unpaused. Same thing applies for stopping. - Changes in audio volume are not recorded. If you don’t wan’t it to record the audio, in the Video Recoder settings set the audio codec to NONE.
- Similarly, changes in the video (toggling fullscreen, aspect ratio etc) are not recorded.
2. After you’re done recording what you wanted, switch to the Video Recorder and click the Stop button. You can also press the Alt+C to stop the recording.
The recording will also automatically stop recording if it detects there is no source (video ends/stops) though the timer will continue running until you click Stop..
3. Now just check the output folder and you should find your recording nicely encoded and ready for viewing, sharing, archiving or editing if you need to cut out stuff.
So basically that’s it. Much thanks to the PotPlayer developer(s) for making what seems like a daunting task into something quite simple and most of all, free of charge.


Aloha, Kevin,
Thank you for your previous contact. I haven’t been back to your site until now. I can’t seem to locate your email but I did download the latest version of PotPlayer and was able to record the sample http://commondatastorage.googleapis.com/gtv-videos-bucket/sample/BigBuckBunny.mp4
I can record this even with ad blockers and tracking blockers on.
But I can’t seem to record anything else, even with ad blockers and tracking blockers turned off. I’ve tried stuff from Vimeo and from Amazon Prime. I always get this message:
“Failed to start playback. Unable to connect to the requested server. –Check that the URL is correct [It is] and the server is running. [It is.] — Check that you’re connected to the net [I am] and PP isn’t blocked by a firewall. [It’s not.]
Bottom line: I can get PP to work with the test URL, but not (so far) with any other.
Do you have any idea what is going on? Are there sites that might block PP from their end?
Thanks
BG
Update. I can record various YouTube items. Still can’t figure out what’s going on with Vimeo and Amazon.
BTW this feature of PP is awesome. I started recording a 21 minute surf video, then closed that window and came here. I’m watching PP record the surf video as I type this.
Thank you so much for sharing this great information. I actually had PP a long time ago but I believe at the time all you could do was record the screen image from your monitor and the results weren’t all that good. This is great!
Hi Davis,
Glad to hear you got Youtube work. I suspect YouTube works because PotPlayer has inbuilt support for its links. The links on video sharing sites such as YT and Vimeo don’t point to the actual video file (https://…..video.mp4 i.e are not direct video links), so the normal links have to be decoded first. I suppose that’s why you cant record from Vimeo and Amazon Prime.
i use potplayer record a video,but it interrupted by accident,than recorded file can’t play,how can i fix file if there have a solution?
Sorry Lee, I don’t have a solution for that.
I just came across this great post, thanks!
One problem: PotPlayer can’t open any URL no matter which one I try.
I always get a “Unable to connect to the requested server” message.
Running Win7, browser is latest Firefox.
–The streaming cam is running on the selected URL, I can see it.
–I’ve turned off all filters and tracker blockers.
How can I solve this problem?
Check your inbox. I’ve replied to your email.
Thnx for this, but in PP v 200337 x64, what is the effect of HQ video compression (chk box alongside BitRate under Video Codec) ?
You have not mentioned this feature.
Sorry v 200317
I think that stands for High Quality Compression but I’m not sure what it does exactly. I’ve tried recording a video with the option turned off and on but I couldn’t see any noticeable differences in their video sizes, quality and the encoding settings using MediaInfo. However, if I had to speculate from the title, I’d say its probably supposed to achieve better compression at the same quality.
Hi, do you know if there’s anything for Mac that has the same feature as this in the Potplayer? Potplayer is currently only available in Windows, but I like to be able to record a playing live video (Youtube) on Mac. Thank you!
Hi Rina, sorry but I’m not aware of a similar software for Mac (I don’t own nor have access to one at the moment). You should however be able to record the live video in fullscreen using a normal screen recording software such as OBS Studio.
Try YouTube-dl
https://techwiser.com/how-to-install-youtube-dl-on-mac/
My recorded output file comes with choppy audio, as if the video is being paused and resumed every millisecond, what could be the problem here, i even set the speed to 2 and this still persists? I tried different formats as well as changing screen capture method, it’s all the same, i would really like to have this feature but as of now i can only make screenshots with potplayer, videos are totally botched for some reason
Hello Peter,
Did you try changing the video codec? That’s the most resource consuming variable in the recording process. If not, start by testing some of the other lossy codecs available like H.263, WMV1/2 or VP8/9 instead of the default MPEG-4 / H.264. If the issue persists you can also try one of the lossless codec like Huffyuv (the output will be large so make sure you have enough space on your drive, then you can convert it to a compressed MKV or MP4 later on).