The Dicom format (*.dcm) is an image format used primarily in medical imaging devices e.g an MRI. Images of your scans will typically be in this format should you get digital copies of your scans from the radiologist.
Depending on the hospital, these digital copies may be burned onto a DVD/CD which contains the image of the scans in the DICOM format and the necessary software to view them.
As an end-user, however, it may be more preferable to have the images in a standard image format like JPG or PNG which can be viewed on a variety of devices without need for a specific software. Nevertheless, a few Windows images viewers such as IrfanView and XnView do support viewing DICOM images (in the former though you’ll need to install the plugin package to open them).
To convert Dicom to JPG or PNG, one only has to obtain the necessary image files from the physical medium, then convert them on a computer using one of several free image software. A few examples include DCMTK Tools, IrfanView, XnView and some online converters.
This may however not work for all Dicom images. This is because some are compressed using JPEG 2000 image compression which is not supported by many Dicom image viewers and converters. For instance, both IrfanView and XnView cannot open JPEG2000 DCM files while DCMTK Tools only supports them through the DCMJP2K module which is not freely available.
It should be noted that some compressed DICOM images may be using a different file extension and not DCM (*.dcm) as it’s normally the case, e.g I have come across some with a DIC (*.dic) extension. Other valid extensions (not necessarily compressed) include *.acr, *.dc3, and *.dicom.
Fortunately, there’s a workaround that gets around this common limitation. It involves first decompressing the JPEG 2000 DCM images to the typical DCM format that is uncompressed. We accomplish this by using an open source software called Grassroots DiCoM (GDCM). Once decompressed, we can then easily convert the DCMs to JPG or PNG using one of the aforementioned tools. Here’s how to go about it.
Note: GDCM is cross-platform supporting Windows, Mac, Linux, BSD and ChromeOS. For the purposes of this tutorial, however, I’ll be using Windows to illustrate .
How to Decompress a Compressed Dicom Image using GDCM
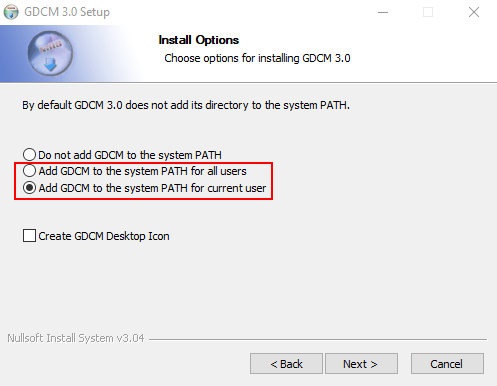
1. Download and install GDCM for Windows from its Github repository.
For the installer version, enable the option to add GDCM to the system path as this will make it easier to use it in command prompt.
As for the portable version you can add it to the system path by going to Control Panel > System > Advanced System Settings > Advanced > Environment Variables… then adding the bin folder to the Path option.
2. Open Command Prompt as an administrator.
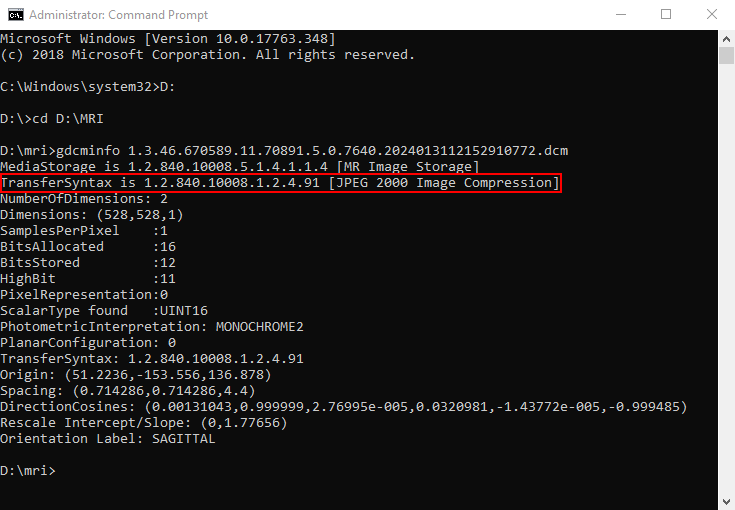
3. Navigate to the folder where the compressed Dicom images are saved. You can then verify the compression of the dicom files by checking one of them using gdcminfo.exe with the following command:
gdcminfo input.dcmIn our case, this will output JPEG 2000 Image Compression in the TransferSyntax line.
4. Decompress the compressed dcm (input) file into a raw dcm (output) file using gdcmconv.exe with the following command:
gdcmconv input.dcm output.dcmThis command will output an uncompressed dcm file to the same folder as the input file.
How to Batch Convert Compressed DCM Images into Uncompressed DCM Images using GDCM
1. Navigate to the folder where the compressed images are saved in command prompt.
2. Create a new folder where the converted DCM files will be saved using the command:
mkdir uncompressedChange uncompressed with your preferred output folder name.
3. Next, run gdcmconv.exe using the command:
for %f in (*.dcm) DO gdcmconv --raw "%f" "uncompressed/%f"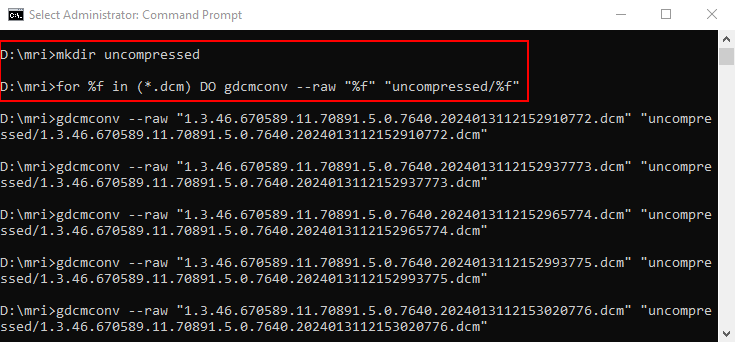
This command will iterate through all the files that have a DCM file extension in the folder, convert them to the raw dcm format, then save the output files into the uncompressed folder.
How to Batch Convert DCM Images to JPG or PNG using IrfanView
1. Download and install IrfanView if you haven’t already. During the installation, you can associate the program with the DCM file extension in order to open them easily in File Explorer using IrfanView.
2. Next, download and install the plugin package which is required to open DICOM images.
3. To convert a single DCM file, either double-click to open it if IrfanView is the default program for DCM files or drag and drop it into its window. After that, press S on your keyboard (or go to File > Save As…) and save it in JPG or PNG or another format you prefer.
4. To batch convert several DCM images, press B on your keyboard to open the Batch Conversion window (or go to File > Batch Conversion/Rename).
5. In the folder browser, navigate to the folder with the images, then click on the Files of type dropdown and select the DCM/ACR/IMA – DICOM/ACR/IMA Format. Doing this will make the DCM files visible.
6. Select all the DCM files to convert, then press the Add button to load them into the input box.
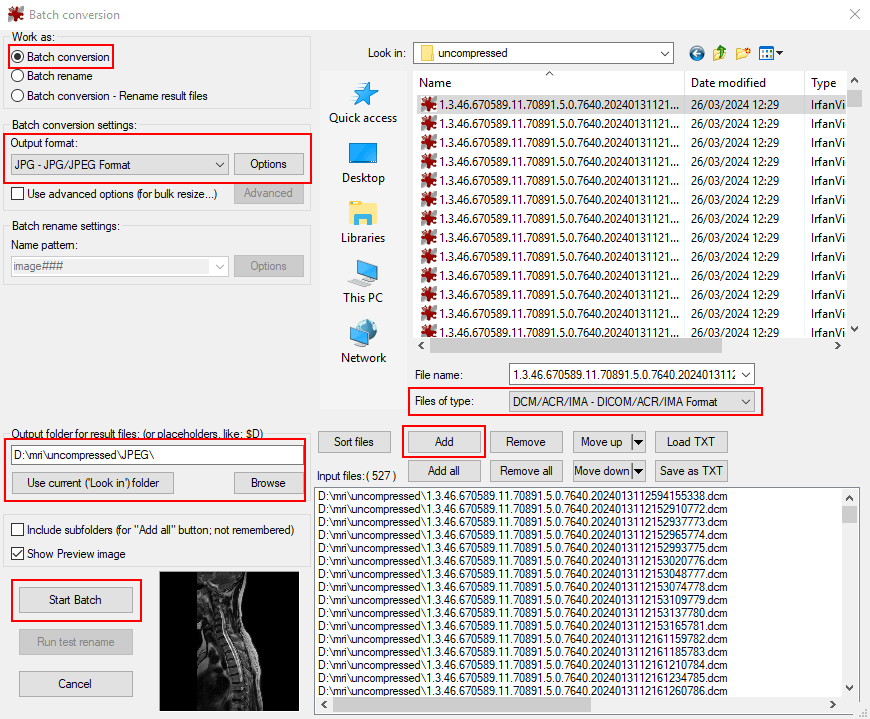
7. On the left side of the window, make sure the Work as option is set to Batch conversion, then just below it select the Output format.
8. Select the output folder then click on the Start Batch button to begin the conversion.
How to Batch Convert DCM Images to JPG or PNG using XnView
1. Download and install the classic XnView or XnViewMP. Both programs have native support for the format, so you don’t need to install any additional plugin.
You can set either as the default DCM viewer by associating it with the *.dcm extension in Window’s Default App settings.
2. To convert a single DCM file, double-click it to open it in XnView if it’s the default program or use Ctrl+O to open the file using the folder browser. After that, press Ctrl+Shift+S on your keyboard (or go to File > Save As…) and save it in JPG or PNG or any another format you prefer.
3. To batch convert several DCM images press Ctrl+U on your keyboard to open the Batch Processing / Batch Convert window (or go to Tools > Batch Processing… / Batch Convert…).
4. Select the DCM files in File Explorer then drag and drop them into the input box. Alternatively, you can use the Add / Add files button to select them manually from the folder browser or the Add / Add folder… to add all the files in a folder and its subfolders.
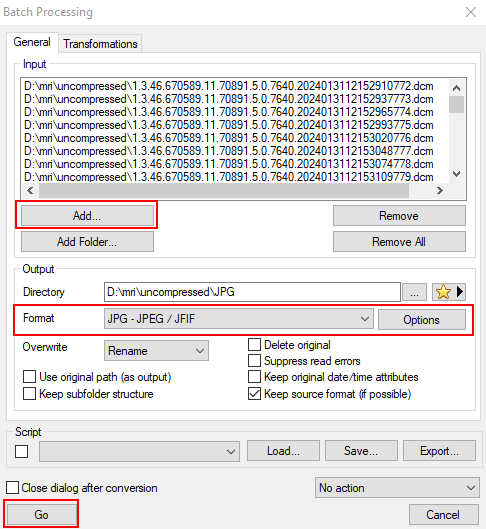
5. In XnView select the Output folder and the Format to convert to, then press the Go button to start the conversion.
In Xnview MP on the other hand you’ll have to go to the Output tab first, select the Output folder and the output Format then click on the Convert button to start the process.
Will Conversion Preserve Metadata in the DCM file?
Unfortunately, the answer is no. Both converters lose the metadata stored in the DCM once converted to JPGs or PNG.
