PotPlayer in addition to having the ability to record what it’s playing or streaming (including one’s webcam feed), it can also do the traditional screen recording.
I use screen recording quite regularly and for this purpose I’ve been using free tools (Active Presenter being my favourite) but it seems now that I may have to consider using PotPlayer in light of its plethora of options.
Some of these include:
- Supports capturing using various methods: Fixed Area Capture, Specific Window Capture and Game Capture (OpenGL, D3D-DirectX 9,10,11,12 support).
- Can capture in full screen or at various predefined/custom resolutions.
- Supports capturing at various frame rates (fps).
- Can capture audio from various sources (mic, speaker etc.) and live previewing it.
- Supports enabling or disabling capturing of the mouse cursor/pointer.
- Supports recording in Picture-in-Picture (PIP) mode i.e. recording two capture areas on the same screen at the same time.
- Supports various smoothing filters.
So as you can see it’s not just another bare-bones screen capturing program, despite the fact that it is geared to playing videos.
An interesting fact is that it supports Game Capture which from a cursory search seems to be a reserve for game capturing software, some of which are paid software.
I presume using this method is more ideal for capturing games using OpenGL or DirectX technologies instead of using the standard Windows capture. I’m not a gamer, but if I was one I would consider giving it a try.
Anyway, enough with the praise, let’s see how it does all these.
Step 1: Set up the Screen Capture
- If you’ve not yet installed the player, you can get it from the official page here. It’s only available for Windows (32 & 64 bit).
- After installing it, launch the player and go to the Device Preferences by going to: menu/right-click > Preferences > Device or by using the key combination Alt+D.
- In the Device Settings window, stay in the Screen Capture tab.

- Under the Screen Capture Settings, select which method you want to use amongst the four:
- Fixed Area Capture – you can adjust the screen capture area as you wish.
- Specific Window Capture – for capturing a specific window only.
- Game Capture – for capturing games.
- Fixed Area Capture via DXGI 1.2 (Windows 8 and later)
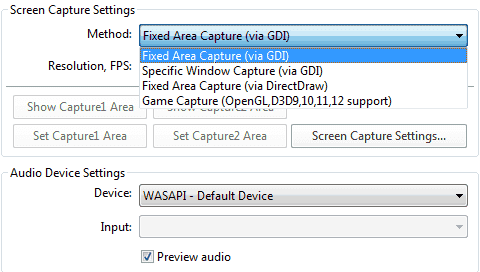
- Below that select the Resolution (size) and Frame Rate (FPS) of the capture. The highest resolution available is what your monitor supports. If you want to capture a particular resolution you can select one of the predefined ones available or you can enter a custom resolution.
- Under Audio Device Settings, select the audio source to record. To record your own audio during the capture, you’ll need to have a mic installed. Make sure it’s plugged in, otherwise it won’t be available in the list, then select it from the dropdown list.
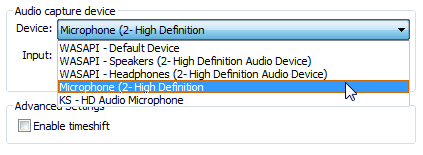
To record audio coming out from the computer select WASAPI – Default Device (selecting Speakers/Stereo Mix may work too). - To customize more settings, click on the Screen Capture Settings… button. There you’ll find a couple settings such as whether to include the mouse cursor or not, using the smooth filter and PIP.
Adjust those options as you see fit (the PIP feature will take some time and experimenting to get used to; I’ve covered how to use at the bottom of this post).
Step 2: Configure Capture Area
After you’re done with the settings, click on the Open Device Button. Alternatively click OK to close the window then use Ctrl+S or go to menu/right-click > Open > Open Screen Capture.
Doing that will open two PotPlayer windows – the camera and the preview screen. You’ll have three windows if you’ve enabled PIP: two for the cameras and the other a preview screen.
The camera window is what you use to define the capture area(s). It uses the resolution that is defined in the screen capture settings, however you can adjust their sizes the same way you adjust windows and position by dragging them.
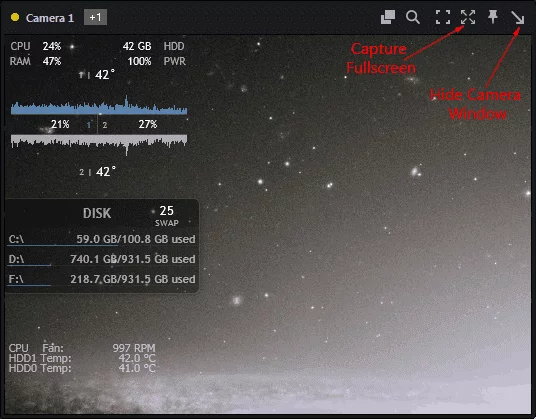
To capture in full screen, click on the maximize button on the camera window.
If you selected Specific Window Capture as the capture method, you’ll be prompted to select the particular program to capture its window. This method doesn’t use camera windows just the preview screen of the captured window.
NOTE:
- I’ve noticed in my system that the live preview window tiles/distorts the captured area when the camera window overlaps inside the preview window. It can get quite trippy, Inception-like. To avoid this reduce the size of the preview window so that it doesn’t overlap with the camera window.
- Check the bottom of this post on how to capture in Picture-in-Picture (PIP) mode.
Step 3: Start Video Capture
Before starting the recording, check the preview window to make sure the capture area is how you want it.
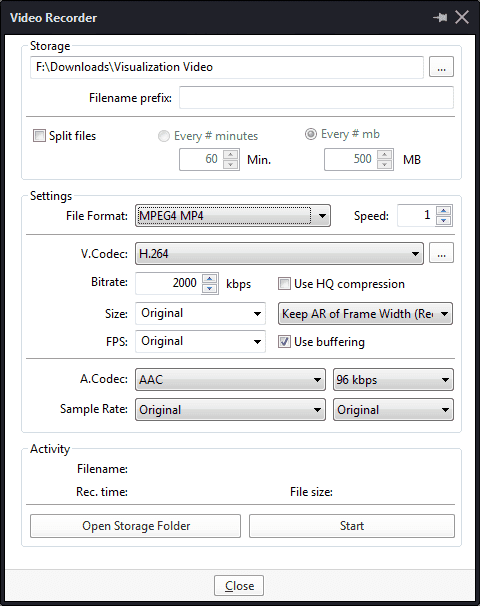
Then, inside the preview window (i.e. Potplayer’s main window) go to the menu/right-click > Video > Video Recording > Record Video or just press Alt+C.
In the Video Recorder settings, first select where to save the captured video and give it a filename prefix if need be. Next, from the drop-down menu, select the video format and the codecs you’ll want the captured video to be encoded in.
NOTE:
- For better flexibility, use MKV as it gives you the widest choice of video and audio codecs to use (lossy and lossless ones). MP4 is however the most widely used format, so you may consider using it also. The caveat though is that it will lessen the choice of codecs you can use (lossy only).
- Regarding the codecs to use, use H.264 for video and AAC for audio for good quality at reasonable sizes. MP4, AVI, WMV and MKV will accept this combination. For any other combination, MKV and AVI will provide you with the widest choice of codecs to use.
- On the other hand, if you choose to use lossless codecs (RAW, YUV, Direct Stream, VFW, PCM, FLAC etc.), MKV is your best choice. However, note that the output size will be very large (hundreds of MB for just a couple of seconds) but at very good quality. Make sure beforehand that you’ve the space to accommodate its sizes.
- For the other parameters (size, fps), just leave them at their default setting (Original) so that they use what is defined in the capture settings. The only thing perhaps you can adjust is the bitrate for the video and audio, as those determine the quality/size of the output video. The default settings are adequate though.
- If you’re capturing full screen you don’t want to record the preview window, so you should get that out of the way by minimizing its window. In fixed area or specific window, you can leave it on the screen (so long as it’s not obstructing the capture area), but I find it quite distracting, and so I minimize it as well.
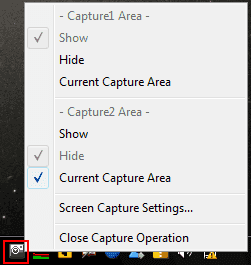
- Also hide the camera window(s) otherwise they’ll get captured to. To do that, use the arrow button on their far right corner. To restore them, right-click on the screen capture icon in the tray and select Show.
Once you’re done click the Start button to start recording.
Once you’re done, restore the PotPlayer window and click on the Stop button (or press Alt+C) to finish the recording. Next, end the screen capturing by going to: menu/right-click > Close File (or press F4).
You can also end the screen capture while it’s running by right-clicking on the screen capture icon in the tray and selecting Close Capture Operation. After closing it you can Stop the recording.
Go to your output folder, and you should find your captured recording in the format you selected.
Capturing in Picture-in-Picture (PIP) Mode
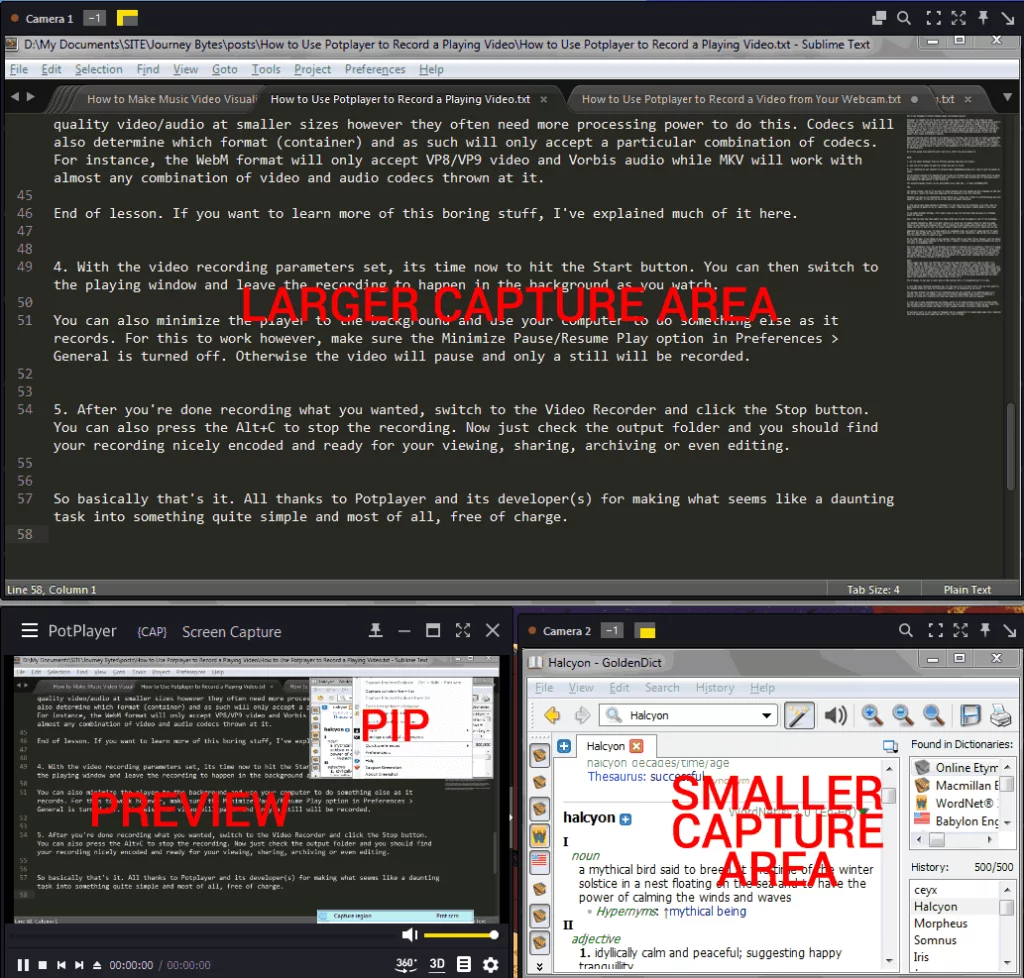
With the PIP feature you can record two different capture areas on the same screen. The smaller capture area will then be embedded on a defined position inside the larger capture area.
To get an idea of what I mean, look at the screenshot below:
To do this, do the following:
- Go through steps 1-6 as outlined in the first section.
- Click on the Screen Capture Settings… button and enable Use PIP (Picture in Picture). Click the OK button when finished.
- Click on the Open device button. That will launch the preview window and two camera windows: Camera 1 and Camera 2. If the preview starts acting up/tiling/flickering, reduce its size. This will also give you room to define the capture areas.
- Adjust and position the size of Camera 1 to fit the capture area you want. This will be the larger capture area of the two.
- Next, adjust and position the size of Camera 2 to fit the area of the smaller capture area (i.e. the PIP – the one that will appear inside the larger capture area).
If you set this larger capture area to full screen you’ll end up recording the PIP while it’s being recorded. So to avoid this don’t set it to full screen.
The PIP should ideally be in a portion of the screen not inside the larger capture area. - Now if you check the preview window, you’ll notice that the smaller capture area (camera 2) is positioned directly in the centre of the larger capture area (camera 1).
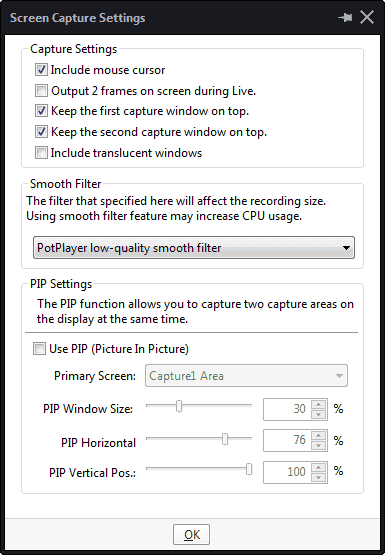
- To adjust the position, go back to the Screen Capture Settings: menu/right-click > Preferences > Device (Alt+D) > Screen Capture Settings…
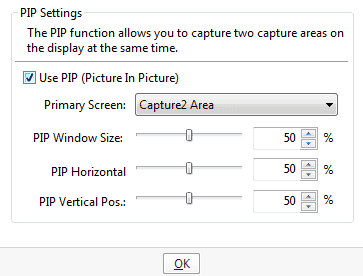
- Under the PIP settings, you’ll notice a couple of things:
- Primary Screen – this is for selecting the larger capture area. By default, it’s set to Camera 1 (Capture1 Area).
- PIP Window Size – this defines the size of the smaller capture area (PIP) as it’s shown inside the larger capture area. By default, it’s set to 50% which means half the size of the larger capture area. If this is too large or small for you, you can adjust it as you check the preview window.
- PIP Horizontal – this defines the horizontal position of the PIP. By default, it’s set to 50% which means it will appear at the horizontal centre position. To move it right or left, increase or lower the percentage respectively as you check the preview.
- PIP Vertical – this defines the vertical position of the PIP. By default, it’s set to 50% which means it will appear at the vertical centre position. To move it up or down, lower or increase the percentage respectively as you check the preview.
- Once you’re done configuring the options, click the OK button.
- Now just follow Step 3 instructions to record the screen capture. Remember to minimize the preview window and hide the camera windows otherwise they’ll get recorded.
That’s it. Hope you found this tutorial helpful.
