This post is a follow-up to the one on free tools that can join videos without conversion. The explanation on how this works as well as the conditions necessary for it to work are in that post. Should you therefore encounter any problems joining your videos as detailed below, please refer to it.
Steps
1. Get and install Avidemux from the homepage. It’s available on multiple platforms, however for the steps below I’ll be using the Windows version.
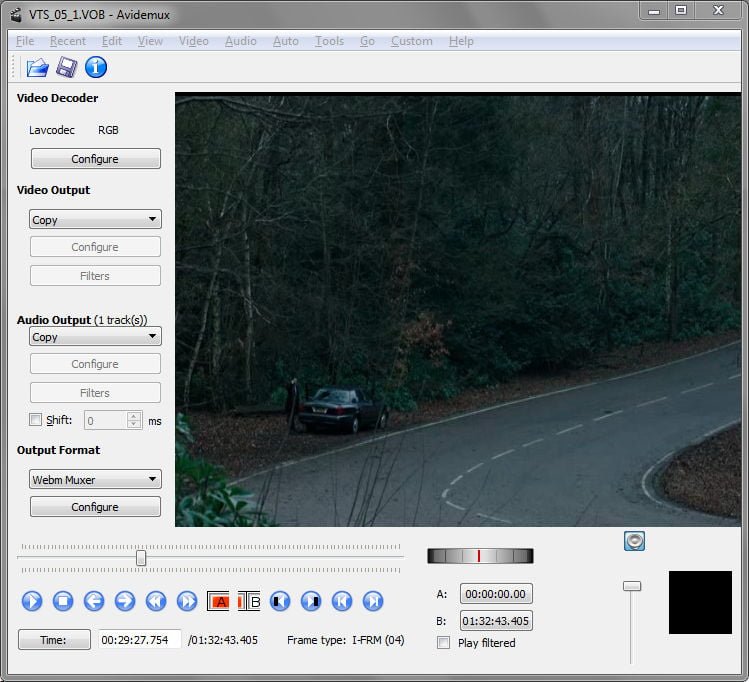
2. Drag and drop your first video into the Avidemux window then give it time to index the video.
3. Next, drag and drop the remaining videos in the order you wish to join them or go to File > Append and select the file to join.
NOTE:
- For DVD VOB parts in the same folder, Avidemux will prompt you to load the additional parts after dragging the first video. Accept the prompt if you wish to join the entire video in that DVD folder, otherwise reject and add the parts that you need individually.
- For DVDs that have title, root and/or chapter menus, make sure not to add their VOB parts. Only load the parts that have the actual video.
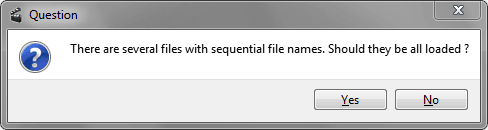
- Avidemux also detects video files with sequential file names in the same folder and will prompt you if to load the rest of the files when you load the first one (e.g. Video Part 1.mp4, Video Part 2.mp4, Video Part 3.mp4).
4. In the left panel under Video Output and Audio Output select the Copy option.
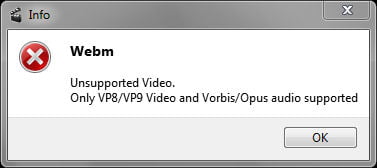
5. Under output, select the container format you wish to output to. Be careful however with the container format you choose since some are limited in the video & audio codecs they support, e.g., WebM. Avidemux will throw you an error if it detects you selected an incompatible container.
Check below for a quick guide on selecting compatible codec and container pairs.
6. After deciding on a suitable container and selecting its corresponding muxer, go to the menu and click the SAVE icon or press Ctrl+S, then choose the folder where you want to save the joined video.
Quick Guide to Selecting a Suitable Codec and Container Pair
- If all the videos have the same container, you can select the original container for output if it’s supported by Avidemux. However, if you need to output to a different container, my rule of thumb is to select the MKV muxer. This is because the MKV format supports virtually any video and audio codec out there. You can also try the AVI muxer though it may prove problematic with some codecs.
- If you need a specific container, you can take a look at this Wikipedia comparison table for a list of the compatible video & audio codecs for every possible container out there (MP4, FLV, WebM etc.).
- For instance, to use the MP4 Muxer, you’ll need video with one of the following codecs:
- Video: H.264/MPEG-4 AVC, H.265/HEVC, H.263, MPEG-2 Part 2, MPEG-4 ASP, VC-1, Dirac and others
- Audio: AAC, MP3, AC-3, Apple Lossless, ALS, SLS, Vorbis
- To check the video and audio codecs in any video, you can use MediaInfo. Windows’ Explorer detail bar also lists this info when you select a video, however it doesn’t work on all videos.


Typo: you say, “In the right panel under Video Output and Audio Output select the Copy option.” I think you mean the LEFT pane.
Great article nonetheless. Thanks.
Thanks for the correction Ray.
While this tool is great for joining videos, your readers should beware that subtitles are completely unsupported – they WILL be discarded.