Files downloaded or sent over the Internet are prone to corruption. As such, it is essential to verify their integrity to ensure the files have retained their original information or work as intended.
Files like software binaries are “self-checking” in that they will fail to execute if the file is corrupted. Other files however have to be verified manually.
The most common way to do this involves verifying a hash or checksum compiled from the original file. To accomplish this, one requires a program that can calculate a file’s check and then check it against the original one. Unfortunately, Microsoft hasn’t included an essential function such as this in Windows.
Consequently, plenty of hash-checking programs exist, however most don’t integrate into Windows Explorer in a convenient. Lucky for us, we have two free ones that do just this.
How to Calculate and Verify Checksums using HashCheck
The first program is the free and open source HashCheck Shell Extension that is compatible with Windows XP and later. HashCheck weighs a paltry 85kb and works straight from the Window’s shell.
After you install it, the program will add a Tab called Checksums in the Properties Dialog of all files which you launch by right-clicking on a file then going to Properties.

Every time you switch to Checksums tab the program will automatically calculate 4 types of checksums that include: CRC-32, MD4, MD5 and SHA-1. MD5 is typically what’s used by most across the web.
To verify you only need to paste the correct checksum (it doesn’t matter which type) in the text box and then hit the find button. If it finds a match, it will highlight it for you meaning the file will have passed the integrity test.

If you’re the publisher or the one sharing a file, you can also easily create a checksum file using the same program. That option is automatically installed in the context menu. To create a checksum file, just right-click on the file, select Create Checksum File and in the Save dialog window select the checksum format you want and then Save.

After that, you only need to package the file together with the checksum file or provide it separately. If the recipient has this program installed, they only have to double-click the checksum and the program will do the rest by calculating and verifying the hashes.
If they don’t have the program, the checksum file is basically in plain text and as such can be opened by any text editor. From there they can get the checksum which they can proceed to verify with their program of choice.
If you don’t require this feature, you can easily remove this item from the context menu by turning it off by clicking the Options button found in the Checksums tab.
How to Compare Hashes of Two Files using HashTab
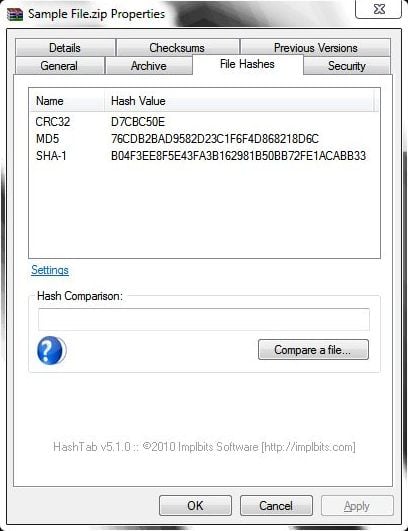
In certain situations, you may also want to compare two files to confirm if they’re exactly the same or are different. For that, you may use HashTab from Implbits.
The software works in the same exact way as HashCheck only that it adds an option to compare two files against each other as well as offering.

It doesn’t really matter which you should use, just pick what works best for you best. Both are freeware but HashTab is closed source and can only be used for personal use, students and for non-profit. So for commercial purposes I take it just stick to HashCheck.
