Tagging music can be quite a hectic thing especially if you’re dealing with huge music collections. But the rewards of such a venture are usually worth the effort if you love keeping your music neatly organized. Most music organizers like Jaangle, MusicBee or Windows Media Player, all rely on proper tags to categorize and sort your music.
Wrong tags therefore could mean having your music collection scattered all over the place with no easy way to tell apart one track from the other. If you love your music, this is not a good place to be. If you’re in that kind of situation, which I’m no stranger to, I got some few solutions for you to make the process painless.
Step 1: Know Which Tags You’re Missing
 |
| Tag MP3s |
If you’ve already tried loading your music collection into a music organizer, then I presume you know which tags you’re missing. The most important tags that you need are:
- Artist
- Title
- Track Number
- Album
- Album Artist
- Year
If you’re unsure about the tags in place, you can use Windows explorer to check that. Just change the view to Details then at the top right click the column and add contributing artist, album and # (track no.) to the details.
For a much easier process, right click the folder with the music, go to Properties then Customize. In there, optimize the folder for Music then click the Apply button.
Windows explorer should now list the music tags for you in detail view now. There are times however when explorer fails to read the tags even when present. If that’s the case, use a tag editor to check the tags. I recommend using TagScanner seeing we’ll use it in the third step.
Step 2: Get the File Names Right
Chances are that your music file names are in some random format like:
Track – 01 – One Love
Bob_Marley_-_One_Love
Bob%20Marley%20-%20One%20Love.m4a etc.
If that’s the case, you’ll need to rename them first according to the tags you need in place. If your file names are proper, just skip this and move to step 3.
The Artist and Title tags are the most important so start with those.
1. Put all the music belonging to one artist in one folder then use a batch file renamer like Bulk Rename Utility. Remove all the unwanted special characters so that you’ve something like:
Bob_Marley_-_One_Love to Bob Marley – One Love
2. If they have no artist name, replace the unwanted word (e.g. Track) with the artist name:
Track – 01 – One Love to Bob Marley – One Love
Alternatively you can remove the unwanted words then add the artist as a prefix.
TIP:
- If the file names are okay and you just want to replace some common unwanted characters (e.g _ or %20 with space) or to (un)transliterate a foreign albphabet, check no.2 under Step 3 below.
3. If you need the track number, make sure to add them using the batch renamer. Just sort them in order then generate the numbers using the Numbering option. You can add the number as a prefix, suffix or in any other position you want:
1 – Bob Marley – One Love or Bob Marley – One Love – 1 or Bob Marley – 1 – One Love
If you need them with zeros (01 – Bob Marley – One Love), I’ll show you later in Step 4 on how to add them.
4. If the tracks have no titles in the file name, there’s no easy way to rename them in batch unless if they all share an almost similar title, which is highly unlikely. Sorry to say, but for that you’ll just have to rename them individually.
5. For the album, album artist and year tags, it’s not necessary to have them in the file name since they’re mostly constant and can be tagged in batch.
Later, if need be, we’ll automatically move the tagged music files into their individual album folders.
Step 3: Batch Tag
Assuming you have the file names in the right format, it’s time now to generate the tags based on the file names. We’ll be using the freeware TagScanner which you can find here.
You can install the set-up version or just use the portable one.
1. Drag and drop the folder with the music or the indiviudal files into TagScanner then switch to the GENERATE tab.
2. Select all the music files you need to generate the tags for.
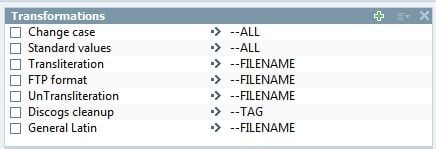
3. On the right under Transformations, you’ve some nice text clean up options that you can use before generating the tags:
 |
| Transformations |
- Change Case – add this if you need the tags to start with capital letters. If you need a different case, double click the text to go to settings and choose the case you need.
- Standard Value – replace common mistakes or unwanted characters automatically. You can also add your custom replacement rule.
- Transliteration – replace foreign characters with their equivalents (e.g Э with E). You also have a list of encodings to choose from.
- UnTransliteration – do the reverse of the above
- General Latin – replace Latin characters with their equivalents (e.g À with A)
- Discogs cleanup
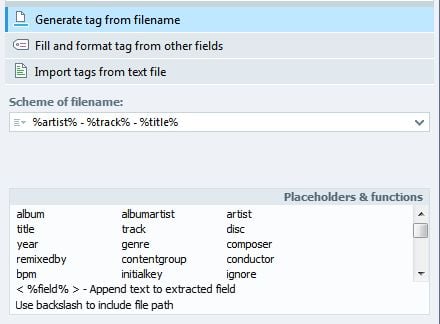
3. Select Generate tag from filename then below under Scheme of filename select the format in which the tags (placeholders) are to be generated from the filename. For instance:
Bob Marley – One Love —-> %artist% – %title%
1 – One Love —-> %track% – %title%
1 – Bob Marley – One Love —-> %track% – %artist% – %title%
1-Bob Marley-One Love —-> %track%-%artist%-%title%
 |
| Generate Tags from Filename |
Note:
- Make sure to include spaces if present
The tags to be generated are shown just below to ensure you get it right. You can add more placeholders like %album% but only if the album name is in the filename.
4. Next click the preview button to check the way the tags will appear.
 |
| Preview & Generate Tags |
5. If you’re satisfied with the results, click the Generate button to apply the tags.
6. Next, move to the EDIT tab and add the Album tags then save. You can also add any another tags you need like album art, year or comments.
Step 4: Adding Zeroes Before Track Numbers
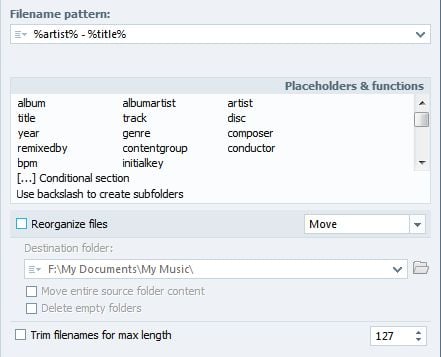
1. To add zeroes to the track number in the file name, move to the RENAME tab, select the files then under Filename pattern enter the tag placeholders (including the %track%) in the format you want the filenames to appear.
TagScanner automatically adds the zeroes to the track numbers when generating the tags so when you rename it will update the filename accordingly. Makes sure you preview the results before clicking the Rename button.
So for instance for the tracks with the filenames:
1 – Bob Marley – One Love —-> %track% – %artist% – %title% = 01 – Bob Marley – One Love
Bob Marley – 1 – One Love —-> %artist% – %track% – %title% = Bob Marley – 01 – One Love
1-One Love —-> %track%- title% = 01-One Love
 |
| Batch Rename |
Should you want to rename the files in a new format, use the same principle as above.
Step 4: Move/Copy Files to Folders Based on their Tags
Now that you’ve tagged the music chances are that you need to move the files into specific folders and/or sub-folders based on these tags. This is especially true if you’re dealing with albums. To do that you can use either TagScanner or Foobar2000. The instructions for that can be found here.
I hope this covers your needs. If you get lost somewhere drop me a comment and I’ll get to you as soon as I can. Also there’s a lot more TagScanner can do, so make a point to check the programs homepage to find out more.
