There are situations when a mobile hotspot created on your Android Phone works fine on other devices, but on your Windows PC it says: Connected, No Internet.
Recently I encountered a similar situation on a fresh installation of Windows 10 Version 1809. Before this I was running Windows 7 SP1 and though I occasionally encountered some connectivity issues of this kind, it had never persisted to the extent I was experiencing in Windows 10.
So what had changed? Nothing apart from the OS as I was still using the same Android phone and cellular network as before.
Troubleshooting Connected, No Internet Error
Running the Network troubleshooter didn’t help and only returned: the Wi-Fi doesn’t have a valid IP configuration Error.
A couple of thing suggested online that I tried to resolve the issue with include:
- Reset your Wi-Fi adapter – this should be as simple as restarting your computer or replugging your external USB Wi-Fi Adapter.
- Release and renew your IP Address: run
ipconfig /releasein command line - Reset TCP/IP settings – run
netsh int ip resetin command line then restart your computer - Reinstall your Wi-Fi Adapter Drivers
- Use a different DNS server – this is what eventually worked for me
How to Change the DNS Server in Windows 10
Windows by default uses the DNS configuration settings from your Internet Service Provider (ISP). In our case, that would be the network carrier whose internet connection is used to create the portable Wi-Fi hotspot.
The ISPs are required to provide this service however you can override them with different DNS services that are more reliable, faster or that provide enhanced security.
Some commonly used alternative Public DNS services include the free Google Public DNS, Open DNS and Cloudflare DNS. Changing your configuration to use one of this or any other custom DNS servers will likely resolve this issue as it did for me.
To do this in Windows 10:
- Right-click the Wi-Fi icon in the system tray and select Open Network & Internet Settings.
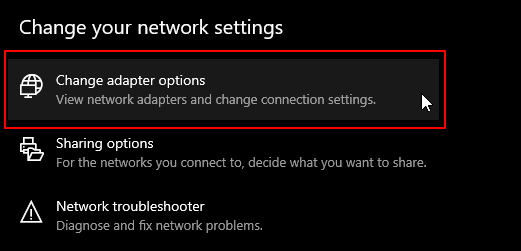
- In the Settings window under the Change your network settings select Change adapter options.
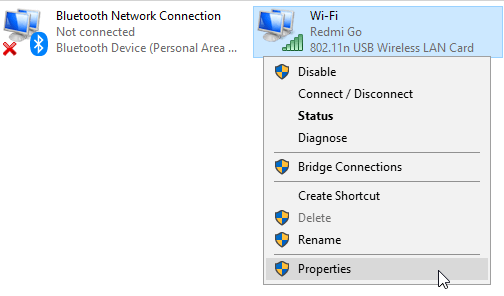
- In the Network Connections window identify your mobile hotspot connection then right-click it and select Properties.
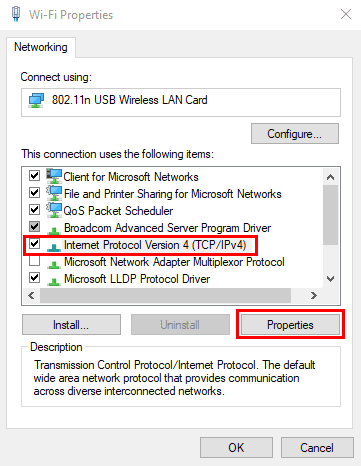
- In the Wi-Fi Properties window select Internet Protocol Version 4 (TCP/IPv4) then click the Properties button.
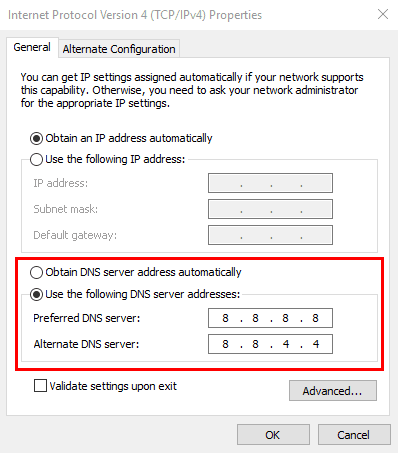
- Select Use the following DNS server addresses, then enter your preferred DNS Servers IP addresses. For example:
- Google DNS: 8.8.8.8 and 8.8.4.4
- Open DNS: 208.67.222.222 and 208.67.220.220
- Cloudflare DNS: 1:1:1:1
- Click OK then close. Now just connect to the hotspot again and see if the problem has been resolved.

Hi, resetting TCP/IP settings worked for me. Thankyou.
Glad to hear it worked for you!
Hi there facing same issue
Changing DNS works
But if DNS is set to auto, no internet on windows via hotspot but running fine on the android phone
Great it worked. I used obtain DNS Address automatically option and it worked. Thanks for the article
Glad to hear it worked for you!
Worked! Thank you very much! 🙂
Welcome!