If you’ve a domain on Namecheap, you can easily set up a subdomain for it. Namecheap allows you to create up to 150 or 100 subdomains for your top-level domain (TLD) depending on which DNS plan you’re using.
Creating a subdomain doesn’t cost you anything extra since you already own the domain. You can use the created subdomain to set up a custom domain for your Blogger blog. Doing this however won’t have any effect on the blog or site that’s already using your top-level domain.
The possibilities are numerous, however on Namecheap the entire subdomain shouldn’t exceed 60 characters in length.
Example of a Top-Level Domain and Sub-domain
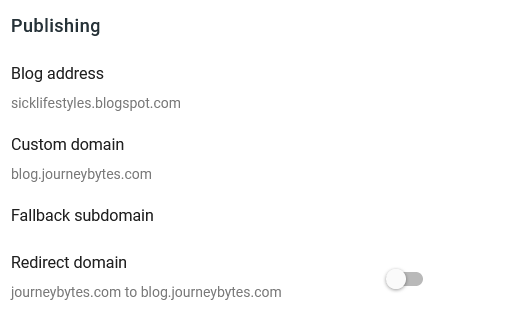
For instance, the top-level domain for this blog is journeybytes.com.
I’ve set it up as a custom domain on my Blogger blog instead of using my original BlogSpot subdomain: journeybytes.blogspot.com.
Yours could be different depending on which TLD you’re using e.g. yourdomain.net, yourdomain.org, yourdomain.co.uk, yourdomain.us etc.
I can therefore set up a subdomain such as: blog.journeybytes.com or reviews.journeybytes.com etc. and use it on a different blog on Blogger or on a completely different platform.
Now that we’ve cleared that up, let’s see how to set up one for a site on Blogger.
Step 1: Creating the Subdomain on Namecheap
- Log into your Namecheap account dashboard and select Domain List from the menu.
- Click the Manage button beside the domain you wish to set up a subdomain for, then switch to the Advanced DNS tab.
- We now need to set up a new CNAME Record for the subdomain. Existing records should be left as they’re. Click on the ADD NEW RECORD button and from the list select CNAME Record.
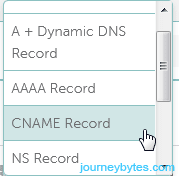
- In the Host entry enter the name of your subdomain (e.g. blog), in the Target enter
ghs.google.com.then leave the TTL at Automatic.
- When you’re done, click on the tick icon to save the changes.
Step 2: Set up the Sub-domain as a Custom Domain on Blogger
- Log in to your Blogger dashboard and select the Settings option from the menu.
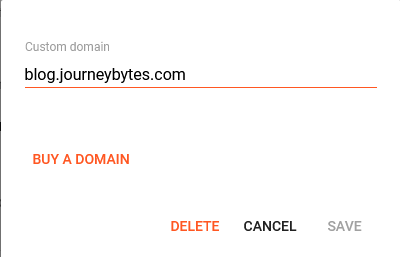
- Click on the Custom Domain option just below the Publishing section.
- A pop window will prompt you to enter a domain. Enter the entire name of the subdomain that we’ve just created (e.g. blog.journeybytes.com) then click the Save button.
- The changes take effect within a few minutes, though Namecheap says it may take up to 30 minutes. So give it some time, then click the View blog link at the bottom of the menu to see your blog on the new subdomain.
NOTE
- You don’t have to set up redirects for posts that you had published on the old domain. Blogger will handle that for you automatically. So if a post was published at yourdomain.blogspot.com/2012/post-url-here/ it will be automatically redirected to yoursubdomain.domain.com/2012/post-url-here/
- Remember to turn on HTTPs Availability and Redirect if you were using them on your original domain and wish to continue using them on the subdomain.
- If you had added the old domain as a property in Google’s Search Console, do remember to do a Change of Address to point it to the new subdomain. You’ll however have to add the subdomain first as a new property before submitting the Change of Address. Site verification won’t be necessary if the top-level domain was already been added.
- Remember to add both the HTTP and HTTPS versions in search console, then select the preferred version.

Thanks for your guide.
I create a new sub domain for my blogspot here:
https://special.xinemads.com as by your reference
on this post.
I hope it works.
By the way, I have a quick asking about this too…
“Should I create a more A RECORD to the google IP too?..
example: 216.239.32.21 … into 216.239.32.21 ?”
I really appreciated for every words from your answer’s.
regards.
Richard
Hello Richard, you don’t need to add A records for the subdomain. The 4 A records are only required when you’re linking the top-level domain that has WWW, for your case that would be wwww.xinemads.com.
Thanks Pal.
It 100% works now.
I really appreciated for your guiding.
regards.
Richard
My pleasure!
Hi! Thanks for the article. How do I enable https for this subdomain? Everything is working fine but my blog is http://blog.example.com Thanks in advance.
Hi Ivan, you should be able to activate HTTPS in Blogger’s Settings, not in Namecheap.
This was very helpful. I created the subdomain I wanted and it’s working fine.
Thank you so much, Kelvin.
Glad to hear that, Selipha.