Xiaomi Redmi Go is a budget entry level android phone from Xiaomi that runs the Go edition of Android 8.0 (Oreo). While specs are not its strong points, it looks and handles reasonably well for its price.
I’ve been using one for the past 3 months as my daily driver and overall I’m pleased with its performance and battery life. The only complaint I have is on the paltry 8 GB storage, though a 32GB SD card does a good job lessening its downsides.
Now, the only thing that has been missing on the device up until now is root permissions. I had avoided rooting the device not so much because it voids my warranty but mostly because I had no use for it. With the right apps, the phone serves my needs well.
The way android handles external storage however was the straw that broke the proverbial camel’s back for me – from some apps not being able to write or store data in the SD card to MTP just being a pain in the neck to use, I realized I had to root sooner or later.
Before Rooting
So first things first: I will not be held responsible should you end up damaging your device in the process. With that said, I’ll endeavour to make this post as detailed as possible to ensure we minimize chances of that happening.
Secondly, note that after unlocking your bootloader you’ll no longer be able to receive install Android system updates and your warranty will be voided.
The particular version of Redmi Go I used is as follows:
- Global Edition
- Model Name: M1903C3GG
- Android Version: 8.1.0
- Android security patch level: 1 May 2019
Step 1: Enable Developer Options
1. On your Redmi Go to your Settings > About Phone and tap the Build Number until you get the notification that you’re now a developer.
2. Next go to Settings > System > Developer Options and toggle the ON button then scroll down to the Debugging section and turn on the USB debugging toggle.
Step 2: Set Up ADB and FastBoot
The steps outlined here apply to those on Windows though the rooting can be done on both Linux or Mac.
- Download the Android Platforms tools for Windows. This package contains ADB and Fastboot tools that we’ll need for making the backups, unlocking the bootloader and flashing the recovery.
- Extract the package on a drive on your computer e.g. in
C:\adb\platform-tools. To minimize the likelihood of errors, don’t extract to a folder in a long path or with spaces in it. - Install the Universal ADB driver for Windows (if you haven’t before) then reboot your computer.
- Connect your Redmi GO to your computer via USB then on your computer open a command window (Win Key + R > type CMD > OK) and navigate to the path of the ADB folder we extracted by typing the command:
cd C:\adb\platform-tools - Next type the following command:
adb devices - You’ll get a prompt on your phone with your computer’s RSA key fingerprint asking you whether to allow USB debugging. Check the Always allow from this computer then tap OK.
ADB and Fastboot is now set up and ready to use.
Step 3: Back Up Data (Optional)
Unlocking the bootloader may factory reset the phone and thus erase all the installed user apps along with any data in the internal storage. Even if it does not, its always a good idea to have a back up just in case of any unforeseen mishaps.
To avoid losing these data, you’ll need to do a backup of your apps that you can restore back after we’ve done the rooting. Depending on your needs, you can do a backup using one or a combination of the following:
Option 1: Manual Backup
As the name suggests this implies doing the backup by yourself provided the apps allow for it. A few options you may consider include:
- Copy all your personal data (photos, videos, music, documents etc.) in your internal storage to your computer. You can then copy them back after rooting.
- Some apps allow you to export backups of settings or data to your storage that you can import after reinstalling the app (e.g. K-9 mail, BlackPlayer).
- Other apps will allow you to sync your data in the cloud to a linked account that can be restored by simply logging in to this account (e.g. Firefox).
- Sync your contacts to your Google Account in the Contacts app or export to a VCF you can import later.
- Backup your WhatsApp chats to Google Drive or locally. If you choose the latter, make sure you back up the WhatsApp folder in the internal storage to your computer or SD Card.
- Use the SMS Backup & Restore app to back up your SMS and Call History locally or in the cloud. After the reset, reinstall the app and restore the data backup.
Option 2: Backup with Google One
This is the default backup option available in the phone settings which backups data to your Google account storage. To carry it out:
- Go to
Settings > System > Backup, enable the option to Back up to Google Drive, then add or choose a Google account to assign the backup. - Finally choose what to backup:
- Apps and their data
- Call History
- Contacts
- Device Settings (including Wi-Fi passwords and permissions)
- SMS.
Note however that some apps and data may not be backed up. To restore this data, during the initial setup after resetting your phone just login into this account and Google will do the rest.
Option 3: ADB Backup
This will allow you to back up app data without root using adb tools. To do this:
- Connect your phone to the PC and open a command window and navigate to the path of the ADB folder we extracted by typing the command:
cd C:\adb\platform-tools - Next run the following command to confirm that your phone is attached:
adb devices - ADB allows you to back up various things while excluding others. For most people, however, one of the following commands should suffice (where
C:\Backupis the folder to export the backup):- To back up the data of your apps without including the apps themselves (apks) run: adb
backup -all -f C:\Backup\data.ab - To back up the data of your apps including the APKs run:
adb backup -apk -all -f C:\Backup\data.ab - To back up the data of your apps including the APKs and the data inside the internal storage run:
adb backup -apk -all -shared -f C:\Backup\data.ab
- To back up the data of your apps without including the apps themselves (apks) run: adb
- After running any of these commands, your phone will immediately open a page called Full backup. In it, enter a password to encrypt the backup then click tap the BACK UP MY DATA button (if your phone is not encrypted, you don’t have to enter a password).
- Now just leave it to complete the backup. It may take anything from a few minutes if you’ve chosen the app only backup, to over an hour if you chose to include APKs and shared storage. Below in Step 9 I’ve explained how to restore this backup.
Note:
- Data for some apps may still be not be backed up even when using this method. Developers decide whether an ADB backup is allowed for their app so unfortunately this something outside our control without root.
- For more backup options, read this reference or run
adb shell bu helpto see a list of commands.
Step 4: Unlock the Redmi Go Bootloader
According to the tutorials online I was led to believe that to unlock the bootloader I had to apply for an Unlock request, open a Mi Account and use the Mi Unlock tool. Apparently this is the standard procedure for all other Xiaomi devices.
I did exactly that but at the end of it I was greeted with a Couldn’t unlock error:
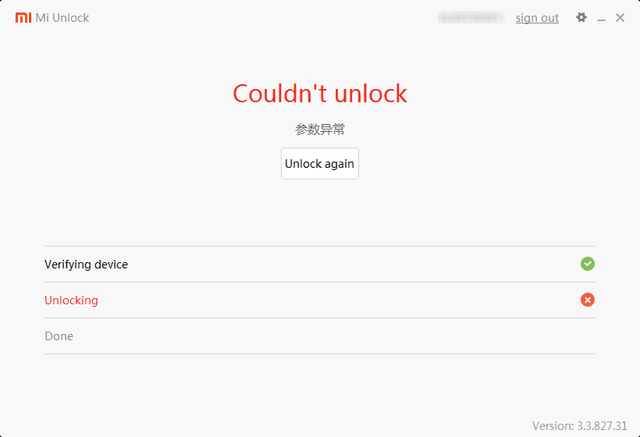
Later on after some inspired searching online it turned out I could unlock it using fastboot as follows:
- First go to Developer options in your phone and turn on the OEM unlocking toggle. If you’ve a pattern / security method set up, you’ll be prompted to complete it.
- Turn off your phone then boot it into FASTBOOT mode by pressing the Lock + Volume Down buttons together.
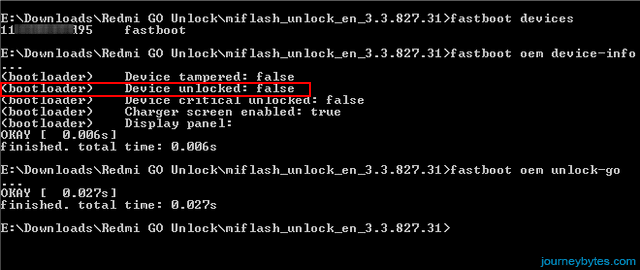
- Connect your phone to your computer and from our ADB folder run the command
fastboot devicesto confirm that your phone is correctly attached. - Then run
fastboot oem device-infoto check whether the bootloader is locked or unlocked. If it’s locked, it will output:<bootloader> Device unlocked: false. - To unlock the bootloader run the command:
fastboot oem unlock-go. You should get an OKAY response after running it as shown below.
The bootloader is now unlocked. To confirm, run the command fastboot oem device-info while still in FASTBOOT mode and you should get the following response: <bootloader> Device unlocked: true.
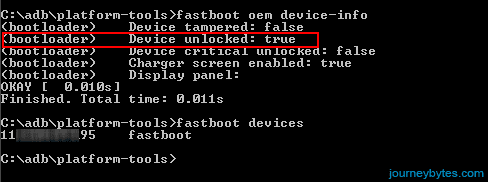
The boot screen will also now read unlocked just below the Mi logo before the Android Go logo displays. We can now proceed to flash TWRP recovery that will allow us to root the device.
Step 5: Flash TWRP Recovery
- Get the Redmi Go TWRP Recovery from SourceForge that’s provided by XDA’s YasiR Siddiqui (please check that thread for updates or if the recovery link is dead).
- Copy the recovery.img file inside the platform-tools folder.
- Get your phone in FASTBOOT mode, connect it your computer then run the following command:
fastboot flash recovery recovery.img - After doing this don’t reboot otherwise the stock recovery will overwrite TWRP as it happened in my case. Instead, run the following command to boot the TWRP recovery you’ve just flashed:
fastboot boot recovery.img - In TWRP go to Reboot and select Power off your device.
- Now try getting into recovery by powering your device by pressing Lock + Volume Up button. If everything went as planned, it should load TWRP Recovery.
Step 6: Fix TWRP Mount Data Partition Error
In TWRP recovery go to Backup and you may notice that the Data (excl. storage) partition reads 0 MB. If you try doing a backup in this state it will fail with the following errors while nearing the end:
could not mount /data and unable to find crypto footer
failed to mount '/data' (invalid argument)
unable to mount storage
unable to mount /data/media /TWRP/.twrps
From what I’ve gathered this happens because the internal storage of the Redmi Go is encrypted. To fix this:
- Go back to YasiR Siddiqui’s project in SourceForge and download the decrypt fix zip.
- Put the decrypt zip file in your internal storage or inside the SD Card and boot your phone into TWRP Recovery.
- In TWRP go to Install, select the ZIP file and tap the Install image button. After it has been flashed power off your device.
- Boot into TWRP recovery again and check the Backup page. The Data partition size should now be listed and a backup completes successfully.
Step 7: Fix Encryption Unsuccessful Error
This happened in my case prior to knowing of the above fix. From what I had gathered at the time the only way I could get TWRP to see the Data Partition was to format the internal storage.
So I took the gamble and in TWRP went to the Wipe page and selected Format Data. Sure enough that fixed the Data partition error however on booting to System I was greeted with Encryption Unsuccessful message instructing me to reset the phone.
Hitting that reset button however only rebooted the device into TWRP before booting back again to the Encryption Unsuccessful message.
If you happen to be in the same spot, download the same decrypt zip from the previous step and put it in an SD Card. Flash it in TWRP as explained in the previous step then Reboot into System. The encryption error should now be gone.
Step 8: Root by Flashing Magisk
- Download the latest stable Magisk Installer along with Magisk Manager APK from the official page on GitHub.
- Copy the Magisk installer zip to your storage and boot into TWRP recovery.
- Go to Install, select the Magisk ZIP file from your storage, then tap the Install image button.
- Reboot your phone and install the Magisk Manager APK.
- Finally, launch the app and allow it to check for updates. You’re now rooted!
From its menu you can access Superuser to manage apps given root permissions and install and manage modules to tweak your phone.
Step 9: Restore ADB Backup
If you did an ADB backup as outlined ins Step 3 (c), you can restore it by simply connecting the phone to computer and running the following adb command (where C:\backup\data is the path to the data backup): adb restore C:\backup\data.ab
Run this command ONLY after having installed all the apps that were installed during the backup and wish to restore their data.
To batch install apps using ADB, put their APKs in one folder and ensure none of them has spaces in their name, then run the following command (where C:\apk is the folder with the APKs): for %f in (C:\apk\*.apk) do adb install "%f"
After doing this, run the restore the command and your apps’ data (including contacts, call history and SMS) will be restored.
This likewise applies to those that included apks in their backup as in my case the restore did not reinstall the apps from the backup as I had expected. The shared data will however be restored into the internal storage as it was before.
Step 10: Create a Nandroid Backup
Now that your phone is rooted and has all the apps you want in it, go to TWRP > Backup and do a full backup of your phones partitions (System, Data, Boot). This way you can rest assured that you’ve a backup you can always restore should anything happen to your Redmi Go.
This backup however doesn’t include any of your personal data (such as photos, videos, music) inside the internal storage. For these you’ll have to backup manually by either copying them to an external storage (e.g. your PC) or uploading/syncing them to a cloud storage (e.g. Google Drive).
And so this marks the end of this rather long tutorial. Good luck to you!

Many thanks for this detailed guide! I’ve tried few other guides (as well as on XdaDev), but no-one mentioning the step with “fastboot boot recovery.img” command, so only your guide helps me, because with other I’ve always stuck 🙂
You’re most welcome George.
bro i tried to flash decrypt.zip but it showing “Failed to map file ‘/sdcard1/Download/decrypt.zip’ Error installing zip file ‘/sdcard1/Download/decrypt.zip”