While exploring how I could use PotPlayer to record the video it’s playing from various sources (TV, Streaming etc.), I stumbled on the fact that it could also capture and record video from the webcam.
Now, this is something that we’re often compelled to purchase software for unless the computer comes with a preinstalled program like Cyberlink YouCam.
While PotPlayer may not have the more advanced features of commercial webcam software, if all you need is to record your webcam, it’s more than capable for that task. You don’t even need a video encoder since it converts the recording in the fly to a video format of your choice such as MP4, MKV, AVI etc.
To record the video feed from your webcam, you’ll need:
- A computer running Windows
- An installed Webcam (external or built-in)
- A mic (external or built-in) if you wish to record the audio as well.
Don’t have a webcam? If you have an Android phone, you can actually use it as a Webcam. Just search online and you should find some online tutorials on how to go about that.
Step 1: Set Up Webcam to work with PotPlayer
- If you’ve not yet installed the player, you can get it from the official page here. It’s available for Windows 32 & 64 bit.
- After installing it, launch the player and go to Device Preferences by going to: menu/right-click > Preferences > Device. Alternatively, you can just press the combination Alt+D.
- In the Device Settings window, switch to the Webcam tab. Under the Device, select your Webcam from the drop-down menu.
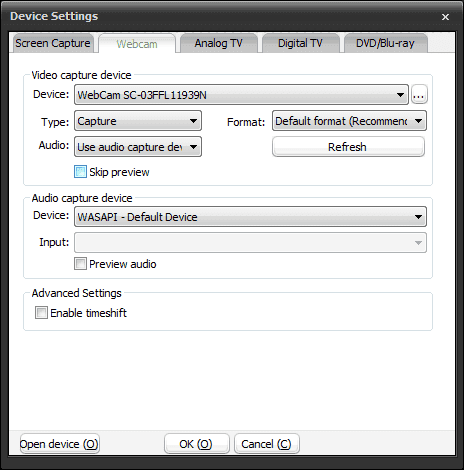
- Under Type leave it at Capture and Format (resolution, fps, aspect ratio) at Default. If you however want a particular resolution, you can select it from the drop-down menu. As for the Audio option, leave it at Use audio capture device.
Note: Enabling Skip preview will disable the video feed from being viewable in the player. It will show a black screen instead, and therefore the webcam feed cannot be recorded. Don’t use this, otherwise you’ll get an empty video.
Step 2: Set Up Mic to Capture Audio
If you want to capture the audio while recording your webcam, you’ll need to configure a mic for PotPlayer to use.
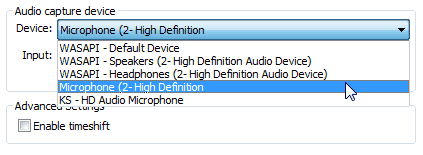
To do that, in the same window go below the Audio capture device section and select your Microphone from the drop-down.
Alternatively, you can record an audio file playing on your computer (for example, some music) instead of the mic audio .
To do that, select your Speakers or Headphones as the device from the drop-down.
Once you’re done configuring these options click on the OK button.
NOTE:
- Enabling Preview audio will play the mic audio through the speakers. Turn it on if you want to hear (repeat) yourself during the recording.
- There seems to be no way of disabling audio capturing, however selecting WASAPI – Default Device on my laptop doesn’t record any audio. Alternatively, you may select Speakers but then don’t play anything on your computer otherwise it will be captured.
Step 3: Preview the Live Webcam Video
With the capture settings configured, we now need to test that PotPlayer can pick the webcam signal.
To do that, go to the main window and press Alt+J or right-click and navigate to Open > Open Webcam/Other Device. Doing that should now preview your live webcam feed on the player.
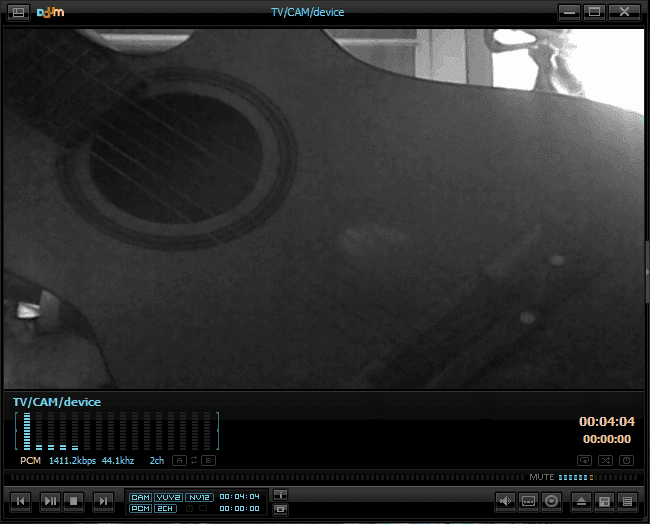
If you get a black screen instead, go back to the Device settings and make sure you’ve selected the correct Webcam (they may be more than one). You may also want to test that your Webcam is working, and the correct drivers are installed.
Step 4: Record and Encode the Webcam Output
Now all that’s left is to record the webcam feed. To do that, first go to: right-click > Video > Video Recording > Record Video or just press Alt+C.
In the Video Recorder settings, select where you want to save the recorded video and give it a filename prefix if need be.
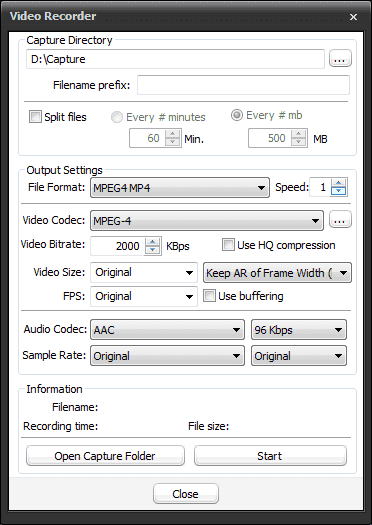
Next, from the drop-down menu, select the video format you’ll want the player to use for the recording and below it the codecs to use.
Here are some important points to consider when selecting the video format and codec:
- For maximum flexibility, MKV is the best choice as it gives you the widest choice of video and audio codecs to use (lossy and lossless ones). MP4 is however the most widely used format and so that’s most likely what you’ll want to use. The caveat though is that it will lessen the choice of codecs you can use.
- Regarding the codecs to use, for good quality at reasonable sizes use H.264 for video and AAC for audio. MP4, AVI, WMV and MKV will accept this combination. For any other combination, MKV and AVI will provide you with the widest choice of codecs to use.
- On the other hand, if you choose to use lossless codecs (RAW, YUV, Direct Stream, VFW, PCM, FLAC etc.), MKV is your best choice. However, note that the output size will be very large (hundreds of MBs for just a couple of seconds) so make sure beforehand that you’ve the space to accommodate this.
- The other parameters (size, fps and bitrate) will suffice as they’re. Leaving the size (resolution) in Original will use the size you selected in the Device Settings (the default being what the Webcam supports, for instance mine does 854×480). The only thing which you may want to adjust are the video and audio bitrates if you’re not happy with the quality (increase) or want to reduce the file size (reduce).
With these parameters set, click on the Start button to begin the recording. When you’re done, press the Stop button or press Alt+C to stop the recording.
Now just check the save location you chose, and you should find your webcam recording there – encoded on the fly and ready to be put to good use. Well, that is, if you don’t mind editing out any parts.
