This article is a follow-up to the one on free tools that can join videos without conversion. The explanation on how this works as well as the conditions needed for this to work are in that post, so make a point to read it should you encounter problems joining your videos as detailed below.
As previously stated, tsMuxeR only outputs to TS and M2TS containers. As such, unlike when joining to MKV which supports numerous codecs, here you’ll be restricted to a handful of video formats you can input.
It supports only the following formats:
| Type | Supported Formats |
|---|---|
| Video Codecs | H.264/MVC, Microsoft VC-1, MPEG-2 |
| Audio Codecs | AAC, AC3 / E-AC3(DD+), Dolby True HD (for streams with AC3 core only), DTS / DTS-HD, LPCM |
| Subtitles | M2TS Presentation graphic stream, SRT |
| Container | TS, M2TS, SIFF, MOV/MP4, MKV/MKA, MPG/VOB/EVO, Blu-ray |
If your videos have a combination of the above video and audio codecs, you can safely proceed to use tsMuxeR. The same holds true if they’re using TS and M2TS containers. For the other containers, however, in particular MKV and MP4, verify the video and audio codecs as they may be unsupported.

To check the video and audio codecs in any video, you can use MediaInfo. The Windows Explorer Details Bar also lists this info when you select a video, however it doesn’t work on all videos.
Join Vidoes Losslessly using tsMuxerGUI
- Download and install tsMuxeRGUI from VideoHelp or the developer’s GitHub page. The software comes as a standalone package and is available for Windows, macOS and Linux.
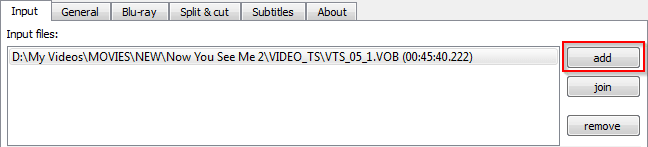
- Run tsMuxerGUI then in the Input tab, click the Add button to add the first video to join. You can also drag and drop the video into the input box.
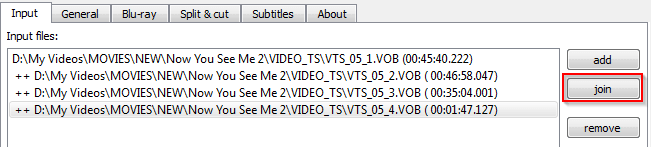
- Next, click the Join button and select the video to join to the first. If you’ve additional videos, repeat the process for them.
- Next, select the Output format. You’ve the choice of TS and M2TS as well as Blu-ray ISO, Blu-ray and AVCHD Folders suitable for hardware players. Demux is for separating the streams, so don’t use that.
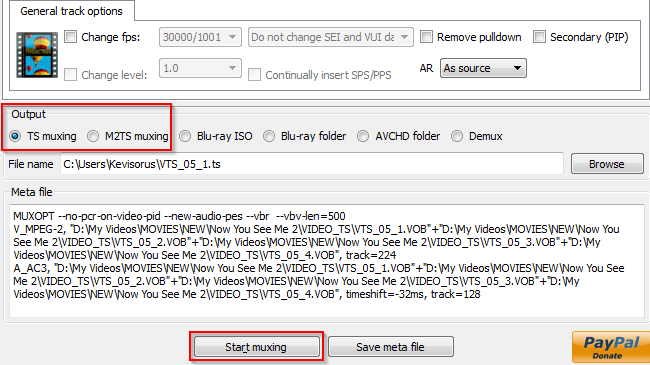
- Click the Start muxing button to start the joining process.
Verifying the Codecs
After loading the input videos, a list of their video and audio codecs will be shown in the Tracks box. Make sure the listed codecs in the supported list, otherwise the muxing won’t work.

You should also have only one video and one audio codec listed there — any more will mean your videos use different codecs and the joining won’t work even if the codecs are supported.
