Google provides a way to view your entire comment history but no way of saving these comments. For that purpose we don’t need any third party plug-ins or scripts, instead we can make use of Google’s Takeout service (and no, Google doesn’t run a fast food franchise on the side).
The takeout I’m referring to is a Google service that allows you to download entire or specific data that they’ve stored on your use on various Google products, one of them being YouTube
You can get a takeout of your YouTube data and basically this comes as a download containing your YouTube data such as watch history, comments, playlists, likes, uploads, watch laters and subscriptions.
In the case of comments, they’re neatly packaged in a HTML file you can view on your computer using any browser.
Export YouTube Comments using Google Takeout
- Sign in to the Google account associated with the YouTube profile you want to export the comments. If it’s a channel profile whose comments you want to export, then make sure to switch to the respective brand account after signing in.
- Next open the Google Takeout page.
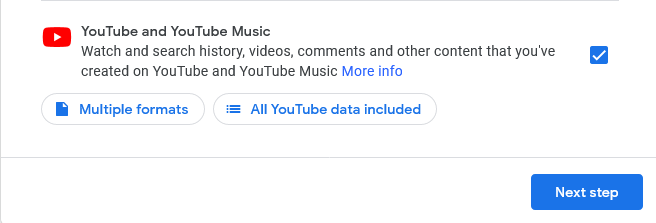
- That will open a page with a wizard containing all of Google Products to export their respective data. Deselect all the items using the checkbox at the top, then scroll to the bottom and check the YouTube and YouTube Music item.

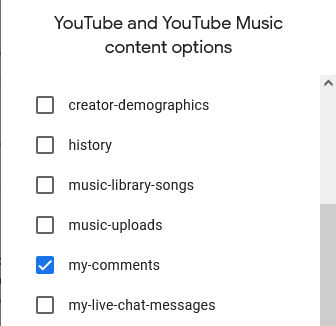
- Click the All YouTube data included button on this item. That will open a small pop-up window listing all the different type of data that are available for exporting from YouTube.
- Deselect all the options using the checkbox at the top, then scroll down and check the my-comments option. Click OK to close the window.

- Click the Next step button to continue with the wizard.
- In the second part, start by selecting the Delivery method, which denotes where the export will be saved. You can either be sent a download link to your email or the export can be added to your Google Drive, OneDrive, Dropbox, or Box account. Select the download link option to save the export to your computer.
- Next, select Once as the frequency of the export. Alternatively, you can set a rolling frequency after every 2 months of the current year if you need the data periodically.
- Select between Zip or Tgz for the export’s archive format, and the archive split size if necessary.
- Click the Create export button to start exporting the comments.
- The export may take a few seconds to hours to be generated, depending on the amount of comments you have. Once it’s ready, you’ll be redirected to a page to download the export. Another download link will also be sent to your Gmail’s inbox.

The download will be available for the next seven days should you wish to re-download it. As a precaution, you’ll be prompted to sign in again before the download can begin.
View your Comments
Once you’ve your download, extract it with your archiving program (or Windows Explorer) and you should get a HTML file (index.html) inside the extracted folder. This HTML file provides a summary of the data you’ve downloaded.
You can view the comments by selecting the Exported files menu which should reveal a link to the my-comments HTML. Alternatively, you can just open the my-comments.html directly, which you’ll find inside the my-comments subfolder.
Opening that HTML file with your browser will show all the comments you have made with that Google account. The comments are formatted in an unordered HTML list and includes a link to the video where the comment was left as well as its timestamp.

Should you want to search through the comments, just use Ctrl+F to search through the page using the browser’s search box.
That said, if you’re like me, then you may find the HTML format a bit too clumsy for archiving purposes. Fortunately, we can just export this HTML to a PDF file which is far more portable and easier to go through.
Export Comments HTML to PDF
We can export the comment’s HTML file in a variety of ways. Here’s a couple of ways to do it while the HTML file is opened on your browser:
1.Microsoft Print to PDF
If you’re on Windows 10, you can use Microsoft’s Print to PDF Printer. This virtual printer will work on any browser you’re on and the PDF should look decent since this HTML is quite plain looking (no complex elements).
2. Chrome Save as PDF
If you’re using Chrome browser, you can use it’s in-built Save as PDF feature by going to the Print page (Ctrl+P). This one is also a virtual PDF printer but it gives you some customization options and from my experience tends to outperform the other one’s mentioned here.
3. Virtual PDF Printer
You can install a free virtual PDF printer program (e.g Bullzip, PDF24, PDFFill etc.) which should allow you to print a webpage to a PDF file from any browser.
Last but not least, you can always convert the file online using free online HTML to PDF converters like HTML2PDF.

Thank you for introducing me to Google Takeout! I’m glad this exists.
Glad you found it useful!