Animated GIFs are often nowadays used across the web as a video format despite being an image format designed for short animations. This is thanks to their ability to play on almost all browsers without the need for plugins as its the case with videos.
A downside however to using GIFs this way is that their compression is not meant for videos and thus results in large GIF sizes for few seconds of runtime. Add to this GIFs with large dimensions (resolution) and the size is further ballooned.
Fortunately, it’s possible to convert animated GIFs to video. This way you can post a video of the GIF in sites such as Instagram which don’t have native support for GIF.
Most video converters out there however don’t support GIF as an input format and will often throw an error if you try loading them. In their place we instead have a handful of online GIF to video converters.
If you have reservations using these online converters I’ve got a neat offline solution for you: it’s called VirtualDub.
Convert Animated GIF to Video using VirtualDub
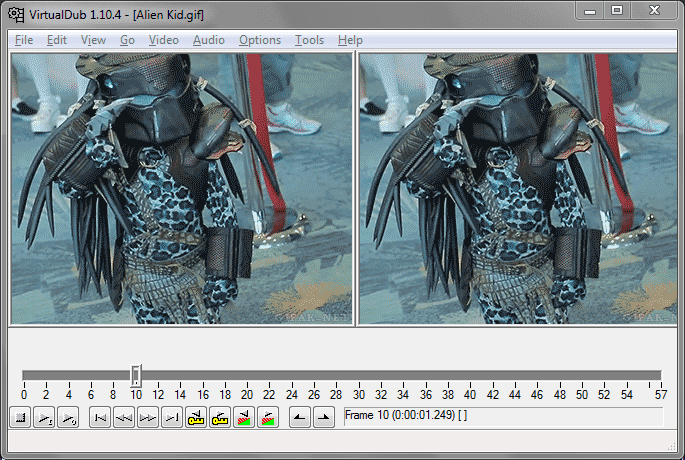 |
| GIF Opened in VirtualDub |
VirtualDub is a free open source video editor that has the ability to load and edit GIFs. While this feature is more geared to exporting videos to animated GIFs it handles the reverse equally competently. Here’s how to:
1. Download the latest VirtualDub. Extract the package and open the program by running VirtualDub.exe.
TIP:
- VirtualDub is only available for Windows but you can get it to run on Linux using Wine.
2. Open your GIF by dragging and dropping it inside VirtualDub’s window or by going to File > Open Video file…
3. Now just press F7 or go to File > Save as AVI…
TIP:
- If you only need a section of the GIF, edit the GIF using the mark in and mark out button to indicate the beginning and end of the video respectively before saving to video.
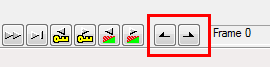 |
| Mark In & Mark Out Buttons |
4. That will open the Save dialog window. Give your video a file name and click on the Save button. VirtualDub should convert your GIF to AVI in a matter of seconds.
Convert Animated GIF to MP4, MKV or Other Video Formats
AVI is not exactly a common video format nowadays so I take some of you may prefer to save the GIFs in a different format like MP4 or MKV. VirtualDub however only supports saving videos in AVI format.
Nevertheless, there’s a couple of things you can do to get past this limitation:
Option 1: Convert Saved AVI
This is the most obvious choice: just use a video converter such as Handbrake to convert the exported AVI to any other format. If you want to avoid this additional conversion check option 2 below.
Option 2: Use VirtualDub2
VirtualDub2 (formerly VirtualDub FilterMod) is an offshoot of the original VirtualDub but with extra features built in. It’s also being updated unlike VirtualDub that hasn’t gotten any updates in the past few years.
One such extra feature is the ability to decode and encode videos in x264/H264, x265, VP8/VP9 and other formats. You can use these codecs to save your GIF in MP4, MKV, MOV and WebM formats as follows:
1. Run VirtualDub2 and follow the steps for VirtualDub above (the interface are similar) then save the file by going to File > Save as… or pressing F7.
2. In the save dialog select the video format to use in the save as type drop down list e.g. MP4 (MPEG-4 part 14)
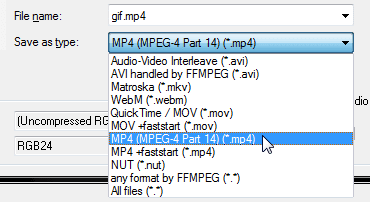 |
| Select Video Format |
3. Just below in the Video compression section click the Change button then select a compatible codec for the format chosen.
 |
| Change Video Codec |
For example:
- MP4 – use any of the x264/H264 or x265 codecs
- MKV – you can use any codec
- WebM – use the FFMPEG/VP8 or FFMPEG/VP9 codecs
- MOV – use the x264 or FFMPEG/Apple ProRes (codec pro)
4. Click OK then the Save button to start the conversion.
Option 3: Use External Encoders
You can get the original VirtualDub to save to MP4 and some other formats by configuring it to use external decoders. The process may however prove a bit complicated for some of you in which case I recommend you just stick to VirtualDub2.
To do this, first follow the instructions provided in this post to set up FFMpeg.exe as an external decoder: you’ll need to load the script provided, download FFMpeg for Windows then point VirtualDub to its location.
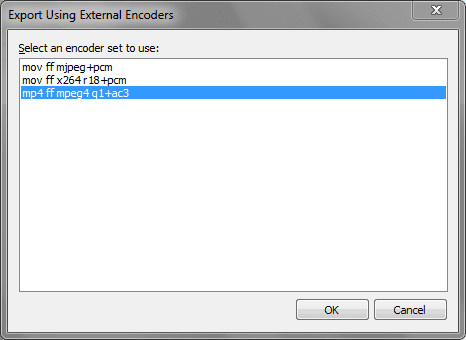 |
| Save to MP4 using FFMpeg Encoder |
After doing this you should be able to save to MP4 or MOV by going to File > Export > Using external encoder… and choosing one of the three encoders as shown above.
