We’ve seen how to unflip videos using various video players on Windows, however that was only a temporary solution as the players merely unmirror the playing video. This is also the case for unmirroring videos online using browser extensions, as we saw on how to unmirror videos on Dailymotion.
A permanent solution requires the video to be edited with a video effect that unmirrors the image. Most video converters out there however don’t usually support such an effect, save for some clipping, cropping and some simple video effects to adjust brightness and contrast.
As a result, you may be forced to use a commercial alternative or full-blown video editor suites such as Sony Vegas for this simple task. This is however unnecessary as you can use the free open source VirtualDub (VDub) with its filters to do this in a couple of minutes.
Let me show you how.
Step 1: Install VirtualDub and FFmpeg Input Plugin
VirtualDub doesn’t support some modern video file formats such as MP4, MOV and WebM. The only common format it supports out of the box is AVI, however you may also run into problems with this format if it’s using some unsupported codecs such H.264/AVC, VP8/VP9 etc.
To get past this limitation, we need to install a plugin such as the FFmpeg Input Plugin which allow you to open most if not all common video formats out there. To do that:
- Download the latest version of VirtualDub from the homepage. If you’re on Linux, you may be able to run VDub in your distribution using Wine.
- To install it just extract the package to a folder somewhere on your computer.
- Next, download the latest FFMpeg Input plugin from SourceForge.
- Run the setup file to install the plugin. When prompted to choose the folder where to install, select the folder where you extracted VirtualDub.
With VirtualDub setup with FFMpeg we can now take a look on how to use it to unmirror almost any video out there.
Step 2: Unflip Video with Flip Horizontally Filter
- Run the program by running VirtualDub.exe.
- Press Ctrl+O or go to
File > Open video file...and select the flipped video. You can also open the video by dragging and dropping it inside VirtualDub’s window. - In the toolbar go to
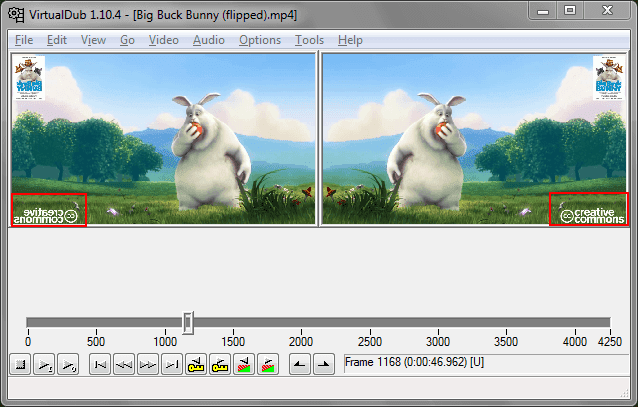
Video > Filtersor press Ctrl+F. - Click the Add… button, select the flip horizontally filter and then click OK to add it.
- You’ll now notice that the video on the preview side has been flipped. The easiest way to confirm this is to seek to a section in the video where there is some visible text like hard captions, credits or a watermark. The text should now be readable.
- Next, if you want to save the file to AVI just go to File and select Save as AVI… or press F7. However, if you want to save the video in different format, you can use FFmpeg as explained in the next step.
Step 2: Save Video to MP4 or Other Formats
While VirtualDub only supports saving to AVI it does provide a means for using external encoders since version 1.10+. The appropriate external decoders if set up correctly can be used to export the edited video to MP4, MKV, MOV and other formats.
A good guide on how to set up some external encoders to save to various formats can be read here. For the purpose of this tutorial, however, I’ll cover only exporting to MP4 or MOV using FFmpeg as explained in that guide.
To do that:
- First, download and install FFmpeg for the version of Windows you’re running.
- Next, download this VirtualDub profile or copy the code from Pastebin and save it to a file named ffmpeg-1.vdprof.
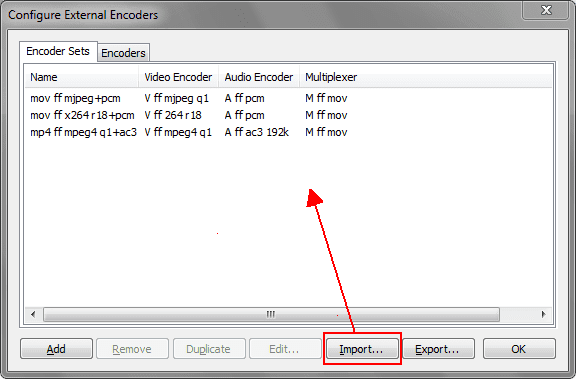
- In VirtualDub go to
Options > External encoders...then click the Import… button and select the ffmpeg-1.vdprof file. Doing that will import three different profiles:- mov ff x264+pcm: to encode to MOV with x264 video and PCM audio (i.e. WAV if you need lossless audio)
- mp4 ff mpeg4 q1+ac3: to encode to MP4 with MPEG-4 video and AC3 audio
- mov ff mjpeg+pcm: to encode to MOV with MJPEG video (lossless) and PCM audio (lossless)
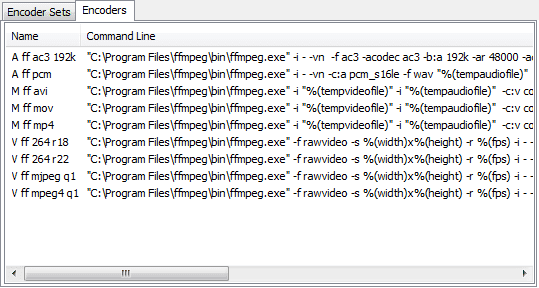
- Switch to the Encoders tab with the following list of profiles.
- Double click to open each of the profiles and in the Program box select the path where FFmpeg is installed, e.g. in
C:\Program Files\FFmpeg\bin\ffmpeg.exe. Click OK to save the setting.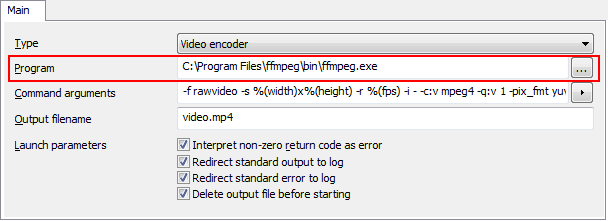
- Now to save your video, go to
File > Export > Using external encoder...and select one of the profiles you’ve just set up and click OK. - Choose where to save the encoded file and give it a name then click the Save button to start the encoding. Give VirtualDub some time to do the encoding. Your video will be flipped horizontally and saved in MP4 or MOV.
Note:
If you’re working with a lossless video and need to retain the lossless quality, then use the mov ff mjpeg+pcm profile to save the video in a lossless MOV. You can then convert the lossless MOV using your preferred codecs and encoding settings for video and audio.
